
I have just started working at Evothings !
It’s a fun gang making slick development tools and libraries for building mobile IoT apps. Evothings is pushing the envelope on really easy mobile development focused on all the new nifty IoT-devices flooding us over the next few years.

In my last article I predicted Elixir to become big and now that I am learning the Evothings tools I wanted to make an Evothings example that uses Phoenix , the Elixir web server framework, as a backend, using its channels mechanism for websocket communication.
Coinciding with the release today of Evothings Studio 2.0 beta 2 (yay!) I will show step-by-step how to:
- Install Evothings Studio locally. It’s just unpacking a zip :)
- Make sure we can run the “BLE Scan” example app and modify it.
- Get a Phoenix server up on a Debian/Ubuntu server on the internet.
- Modify the app and server to use Phoenix channels for publish/subscribe of scan data.
- Verify it all works!
Since not everyone has a Linux server up on the internet you can skip step 3 and just use my public server :)
Let’s go!
The app Link to heading
So what does the app do? The original Evothings sample app (that we intend to modify) scans for BLE (Bluetooth Low Energy) devices nearby and shows a list of them with some information. It’s a very simple example of using your mobile to scan for devices like Estimotes , TI SensorTags or any other device using BLE which modern mobile devices support. It looks like this:
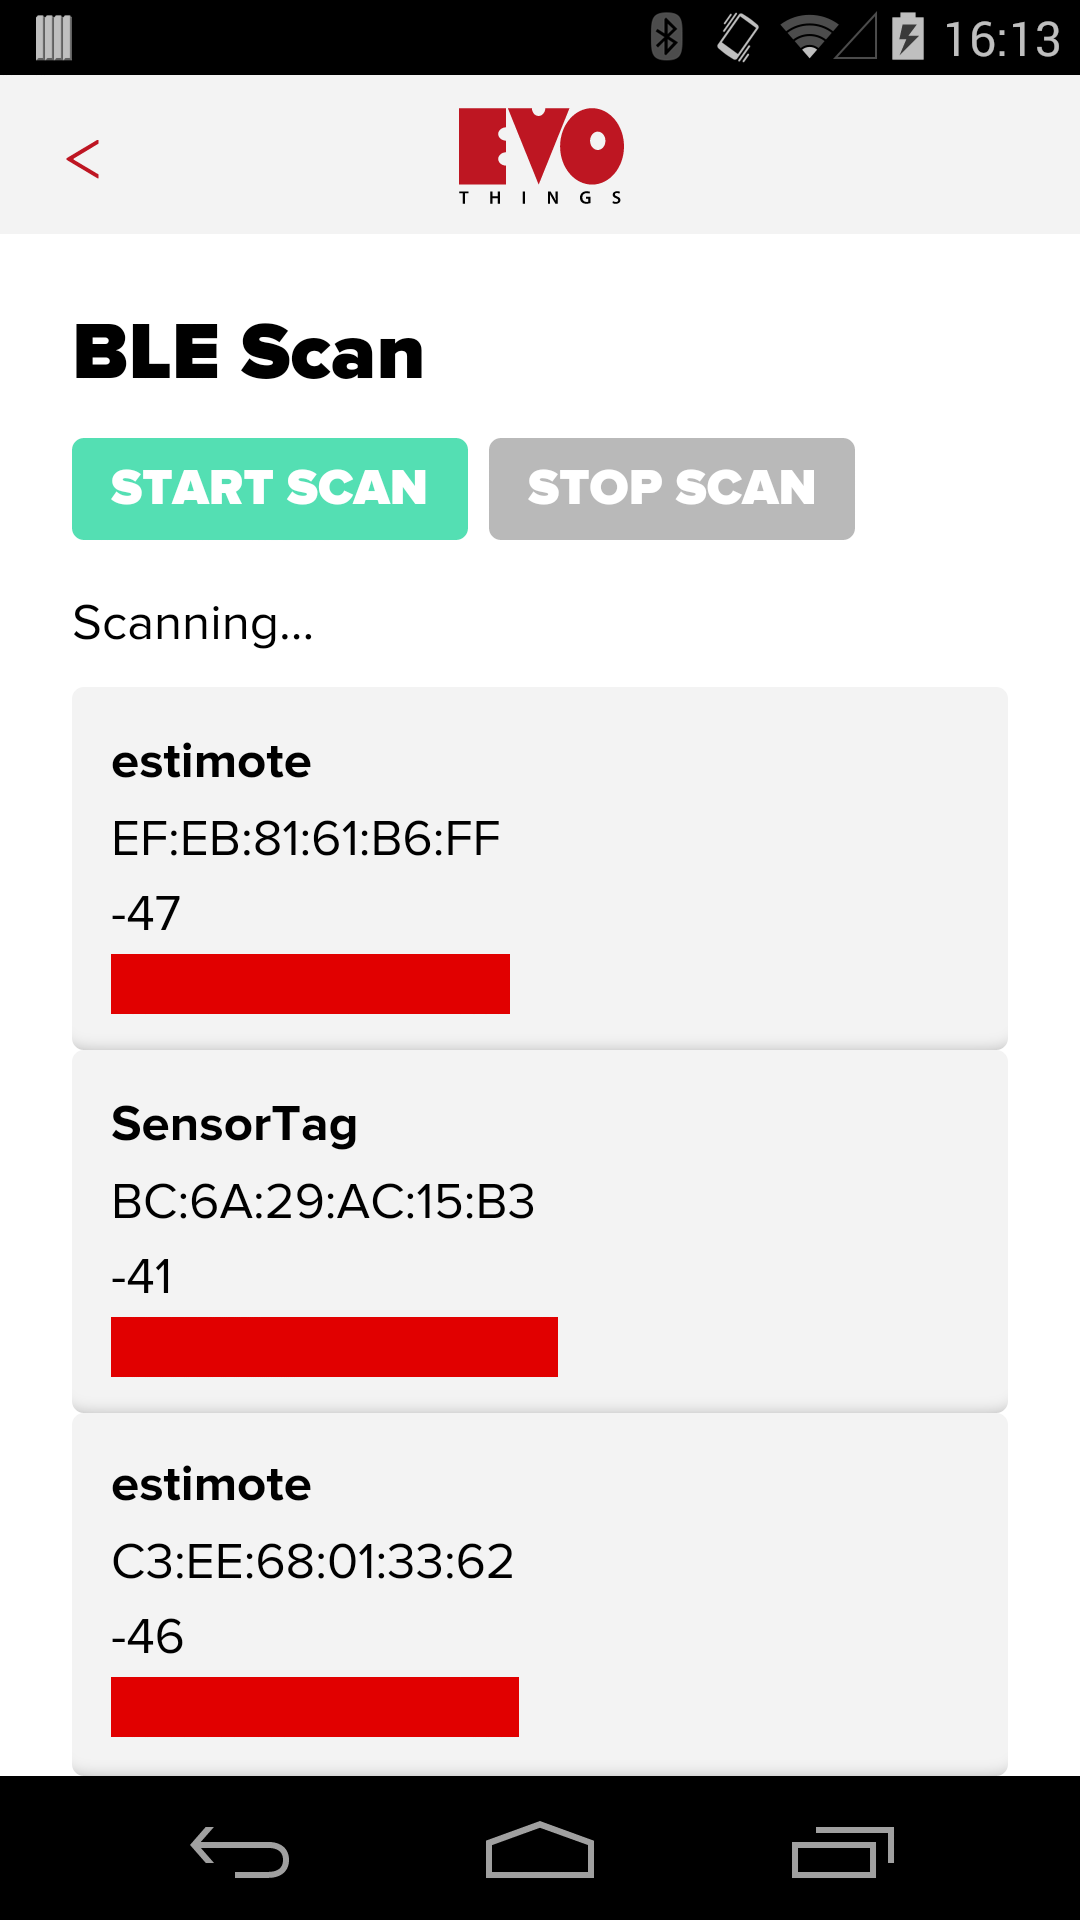
The twist we will add is to let the app send this information to a Phoenix server reachable on the internet, onto a pubsub channel, and then subscribe to that channel in order to populate the list on screen. This means all the participating mobile devices will show the union of all currently scanning mobiles.
The Tech Stack Link to heading
The Evothings mobile app we are modifying is written in Javascript and runs inside the Evothings Viewer - a hybrid web view client that we will install via App Store or Google Play . The viewer is based on Cordova but enhanced in various ways with libraries specifically for IoT scenarios.
The communication between the app and Phoenix will go over Secure Websockets abstracted inside Phoenix Channels .
Phoenix is a new very exciting framework for building highly scalable and very robust web applications. It’s written in Elixir which is a fairly new language standing on the shoulders of a giant - Erlang .
Elixir compiles to Erlang bytecode so an Elixir application, when deployed, is in effect an Erlang application. This article is not explaining why you should be excited about Elixir , Erlang and Phoenix (you should!) but instead shows how to use Phoenix channels together with Evothings.
Installing Evothings Link to heading
Step 1 is to install the Evothings Studio on your developer machine. Don’t worry, it’s just a zipped folder that you remove later if you don’t get hooked :)
Just go to evothings.com/download
, download the correct zip file for your platform and unpack it somewhere. Then run EvothingsWorkbench in the unpacked directory.
When the Workbench opens up you find instructions there on how to proceed under the heading “Getting Started”. Follow steps 1 and 2 and then continue reading here!
NOTE: Yes, we will make proper installers for Windows etc soon.
Just to make sure you have your mobile device connected, try clicking RUN on one of the example apps listed under the Examples tab in the Workbench. You should see it running in your viewer on the mobile device. Easy, right?
Adapting BLE Scan Link to heading
Time for Step 2, making our own variant of the “BLE Scan” example. We will copy and modify it:
- Find the app “BLE Scan” in the list under the
Examplestab, press theCOPYbutton on it. - In the dialog that pops up, change “Destination folder name” to “ble-multiscan”. This will copy the whole directory for the “BLE Scan” app into your own personal “My Apps” directory as the dialog shows.
- In the
My Appstab you now see your own “BLE Scan” (note the directory path saying ble-multiscan). PressRUNto see it running on your phone. - Let’s change the name and title of the application. Press the
CODEbutton and find theindex.htmlfile. Open it in any editor and change the title of the app on line 10 and line 53 to “BLE Multiscan”. Tada! Notice how it autoreloaded on your phone with the new name. The entry underMy Appsshould also have the new name. - Feel free to press
Start Scanon your mobile and see if you can find any BLE devices around, if not… this whole exercise will get fairly boring :)
Install Elixir and Phoenix Link to heading
Ok, so we are up and running with Evothings. You have successfully modified and run your mobile app.
Now let’s get a Phoenix server going… There are multiple routes here you can take:
- Use your own Ubuntu box if you have one with a real ipname that you can make a free SSL cert for
- Get an AWS micro for free and use that one
- Bail out completely and just use my server on the net :)
NOTE: You could in theory use your local dev machine but then you will also need to make sure your mobile device can reach your dev machine by ipname over wifi and you will also need to make a real cert for that ipname typically via StartSSL. This means it’s fairly impractical as you need a DNS name for your machine locally, and in addition you will need to get a proper cert for that specific name - which can also be done of course, but well, I don’t think many will try. :)
I run Ubuntu or Debian if I can choose, and the following instructions are verified for Ubuntu 14.04.3. We are actually simply following instructions found in the Phoenix docs so if you need more details, take a look there.
First we add the Erlang Solutions repo to get access to Erlang and Elixir, and then install the elixir package which sucks in Erlang too.
$ wget https://packages.erlang-solutions.com/erlang-solutions_1.0_all.deb
$ sudo dpkg -i erlang-solutions_1.0_all.deb
$ sudo apt-get update
$ sudo apt-get install elixir
After that elixir --version should report something like Elixir 1.1.1.
Using mix, the Elixir build tool, we can now install the Elixir package manager hex which you can also browse online
, just hit enter as confirmation.
$ mix local.hex
It will be installed as an archive (a zip file basically) locally in your current user’s home directory. Hex is like “npm” for Elixir. The mix tasks inside the archive are then available in mix, so running mix --help will now show a range of hex tasks available.
We then install Phoenix, the Elixir web framework. It is also packaged as an archive but there is no hardwired mix command like “local.phoenix” to install it, so we do it more explicitly using mix’s archive command.
$ mix archive.install https://github.com/phoenixframework/phoenix/releases/download/v1.0.4/phoenix_new-1.0.4.ez
After this we can list our installed archives and it should look like:
$ mix archive
* hex-0.9.0.ez
* phoenix_new-1.0.4.ez
Archives installed at: /home/gokr/.mix/archives
We also notice that mix --help now shows the available task phoenix.new.
Finally, we need nodejs and npm for various frontend tools that Phoenix uses like Brunch , and inotify-tools is for Phoenix live code reloading.
$ sudo apt-get install nodejs-legacy npm inotify-tools
Install PostgreSQL Link to heading
In order to get a “full stack” Phoenix setup I also include information on how to get PostgreSQL going, although at the moment we don’t use PostgreSQL in this example.
Start by installing it:
$ sudo apt-get install postgresql
And we also need to configure the password for the default user postgres that Phoenix likes to use by switching to the postgres user and run some pqsl:
$ sudo su - postgres
$ psql
ALTER USER postgres PASSWORD 'postgres';
\q (enter)
$ exit
Phew! But now we should have all we need to build a Phoenix application.

Create the Phoenix application Link to heading
I am doing this in my home directory, but feel free to do it wherever you like. Let’s use the mix tool to create a Phoenix application called “multiscan”, hit enter on dependency question:
$ mix phoenix.new multiscan
It should create a lot of stuff and end with something like:
We are all set! Run your Phoenix application:

    $ cd multiscan
    $ mix ecto.create
    $ mix phoenix.server

You can also run your app inside IEx (Interactive Elixir) as:

    $ iex -S mix phoenix.server
The concept with having a tool like mix using tasks to generate scaffolding is pretty neat to make sure all Phoenix apps follow the same structure, this is nothing new for Rails people of course but can be a new thing for some of us.
Ok, let’s do what we are being told. Ecto is the database abstraction in Phoenix (wrapping several different databases) so the ecto.create task will create a database:
$ cd multiscan
$ mix ecto.create
This may prompt to install rebar, which is just fine. Then it should compile the whole application and end saying:
Generated multiscan app
The database for Multiscan.Repo has been created.
And hey, run some tests:
$ mix test
You should among other things see 4 tests, 0 failures in green.
And we can also fire up our application which will start serve by default on port 4000:
$ mix phoenix.server
[info] Running Multiscan.Endpoint with Cowboy on http://localhost:4000
Cowboy by the way is the Erlang HTTP server that Phoenix uses. Apache… Cowboy… you get it.
Then check all is working by surfing to http://localhost:4000 !
It should look like my server looks , only difference being my server runs HTTPS on port 1443.
A single git repo Link to heading
Note that you can ignore this section, but I just wanted to mention that you can easily have Evothings handle your app while it is contained in a subdirectory of the Phoenix server application.
The Evothings app is just a directory and Evothings Studio can keep track of several apps under My Apps regardless of where they are on your hard drive. This means we can easily maintain the whole system in a single git repository.

If you are making the Phoenix app on a server then this advice does not really apply. I did all my coding on my laptop and then cloned it over to my public server in the end.
But if you want to do this, let’s move the application into the Phoenix file tree under the name app:
$ mv ble-multiscan ~/multiscan/app
Then we update Evothings Studio’s notion of where the app is by removing it from My Apps by clicking the (x) - yeah, no worries. Then add it back to Evothings Studio by dragging the file ~/multiscan/app/index.html and dropping it on Evothings Studio. Evothings will pick up the directory path for index.html and will consider that directory to be the app.
Finally, you can do the git dance inside ~multiscan:
$ git init && git add . && git commit -m "Initial commit"
Enable Phoenix Channels Link to heading
Next we basically follow the guide on channels in the Phoenix documentation
. First we enable a channel we call “scan” by adding the file web/channels/scan_channel.ex:
defmodule Multiscan.ScanChannel do
  use Phoenix.Channel

  # For now we just use a single public scan "room"
  def join("scan:public", _message, socket) do
    {:ok, socket}
  end

  # All other scan rooms are considered private
  def join("scan:" <> _private_scan_id, _params, _socket) do
    {:error, %{reason: "unauthorized"}}
  end
end
Above we can see that we create our own module called ScanChannel and use the Phoenix.channel module inside it to gain access to those functions. Then we define two variants of our join function and we use pattern matching on the first argument to decide which one is used!
The first one basically says that the topic:subtopic “scan:public” is fine for anyone to join, we return the tuple
{:ok, socket} signifying all was fine. :ok is the syntax for an Elixir atom
which is basically the same as a symbol in Ruby or Smalltalk.

The second definition of join is nifty indeed. The underscores signify that we ignore those arguments, but the first parameter declaration is written as a concatenation of the string “scan:” with “something we ignore”.
Hehe, yeah, <> for string concatenation sure made my eyes widen too, and especially in the context of pattern matching, but dispatching on multiple functions like this is darn neat.
Then we modify a single line in web/channels/user_socket.ex to add the above channel. Click “file” if you want the full raw file instead of the diff.
@@ -2,7 +2,7 @@ defmodule Multiscan.UserSocket do
   use Phoenix.Socket

   ## Channels
-  # channel "rooms:*", Multiscan.RoomChannel
+  channel "scan:*", Multiscan.ScanChannel

   ## Transports
   transport :websocket, Phoenix.Transports.WebSocket
For our mobile app the following is not really needed, but Phoenix also serves a web frontend that can join the same channel. Let us also enable this by including socket.js in our web/static/js/app.js which represents our web application:
@@ -18,4 +18,4 @@ import "deps/phoenix_html/web/static/js/phoenix_html"
 // Local files can be imported directly using relative
 // paths "./socket" or full ones "web/static/js/socket".

-// import socket from "./socket"
+import socket from "./socket"
…and then edit socket.js to have it join our new channel:
 socket.connect()

 // Now that you are connected, you can join channels with a topic:
-let channel = socket.channel("topic:subtopic", {})
+let channel = socket.channel("scan:public", {})
 channel.join()
   .receive("ok", resp => { console.log("Joined successfully", resp) })
   .receive("error", resp => { console.log("Unable to join", resp) })
We can then verify we have a working channel by going to the Phoenix web application at http://yourmachine.com:4000
(or try my server at https://padme.krampe.se:1443
) and press CTRL-ALT-J (typically) to check the console where it should say Joined successfully. Wohoo!

Phoenix channels in Evothings Link to heading
Ok, but… now we want to make the Evothings mobile app talk to this channel! Going back to our “BLE Multiscan” application we need to:
- Add Phoenix channel support.
- Modify the app so that it uses this channel in pub/sub fashion.
The javascript client side code for Phoenix channels is phoenix.js. We need to include this library in our Evothings app, but it is written in ES2015
(aka ES6 or ECMAScript 2015 or ECMAScript 6), the latest version of Javascript, and this isn’t fully supported by browsers yet
so you must use a transpiler to make it work. Whatever one may think of the.. feature explosion in ES6 - it’s probably wise to start learning it.

Our Evothings app is however written in plain ES5 so to avoid rewriting it we would like to use phoenix.js transpiled to ES5. Phoenix already has Brunch
integrated which is a neat “build tool” for the web stuff, and it in turn is configured out-of-the-box to run the Babel
transpiler on all js files in order to compile any ES6 code to ES5 (good ole Javascript).
In other words, we can already find a ES5-compiled version of phoenix.js in our filetree that we can copy and stuff into our mobile app.
$ find . -name phoenix.js
./deps/phoenix/priv/static/phoenix.js
./deps/phoenix/web/static/js/phoenix.js
The last one is the regular source code in ES6 and the first one is the Babel translated one in ES5 - which is the one we want. We copy it into our Evothings app:
$ mkdir app/libs/phoenix
$ cp ./deps/phoenix/priv/static/phoenix.js ./app/libs/phoenix/
… and then we include it as a separate lib in index.html:
 	<script src="libs/jquery/jquery.js"></script>
 	<script src="libs/evothings/evothings.js"></script>
 	<script src="libs/evothings/ui/ui.js"></script>
+	<script src="libs/phoenix/phoenix.js"></script>
 	<script src="app.js"></script>

 </head>
… so we can require it at the top in app.js. Next up is modifying the application itself. Here are all modifications I made with explanations below.
 // JavaScript code for the BLE Scan example app.
+Phoenix = require('phoenix')

 // Application object.
 var app = {};

 // Device list.
 app.devices = {};

 // UI methods.
 app.ui = {};

 // Timer that updates the device list and removes inactive
 // devices in case no devices are found by scan.
 app.ui.updateTimer = null;

 app.initialize = function()
 {
 	document.addEventListener(
 		'deviceready',
 		function() { evothings.scriptsLoaded(app.onDeviceReady) },
 		false);
 };

 app.onDeviceReady = function()
 {
-	// Not used.
 	// Here you can update the UI to say that
 	// the device (the phone/tablet) is ready
 	// to use BLE and other Cordova functions.
+	console.log("Creating Phoenix socket...");
+
+	// For this example I hard coded the host and port of my Phoenix application
+	var socket = new Phoenix.Socket("wss://padme.krampe.se:1443/socket",
+	                                { params: { token: "dummy" } })
+
+	// Nice with some logging in the Workbench when trying it all out
+	socket.onError(function (err) {
+	  console.log("Error Phoenix channel: "+JSON.stringify(err)
+	)});
+	socket.onClose(function () {
+	  console.log("Closed Phoenix channel")
+	});
+	console.log("Connecting...");
+	socket.connect();
+
+	// Now that we are connected we can join a channel with a topic.
+	// Let's join the topic 'scan:public'
+	app.channel = socket.channel("scan:public", {});
+	console.log("Joining...");
+	app.channel.join().receive("ok", function (resp) {
+	  console.log("Joined successfully");
+	}).receive("error", function (resp) {
+	  console.log("Unable to join");
+	});
+
+	// Also register a handler for added devices
+	app.channel.on("scan:device", function (msg) {
+	  app.phoenixReceive(msg);
+	});
+
+	// And start updating list
+	app.ui.updateTimer = setInterval(app.ui.displayDeviceList, 500);
 };

 // Start the scan. Call the callback function when a device is found.
 // Format:
 //   callbackFun(deviceInfo, errorCode)
 //   deviceInfo: address, rssi, name
 //   errorCode: String
 app.startScan = function(callbackFun)
 {
 	app.stopScan();

 	evothings.ble.startScan(
 		function(device)
 		{
 			// Report success. Sometimes an RSSI of +127 is reported.
 			// We filter out these values here.
 			if (device.rssi <= 0)
 			{
 				callbackFun(device, null);
 			}
 		},
 		function(errorCode)
 		{
 			// Report error.
 			callbackFun(null, errorCode);
 		}
 	);
 };

+// Called when we get a device from Phoenix
+app.phoenixReceive = function(msg)
+{
+	// Insert the device into table of found devices.
+ var device = JSON.parse(msg.body);
+	app.devices[device.address] = device);
+};
+
+// Send a device back to Phoenix
+app.phoenixSend = function(device)
+{
+	app.channel.push("scan:device", {
+    user: "Arne",
+    body: device
+  });
+};
+
 // Stop scanning for devices.
 app.stopScan = function()
 {
 	evothings.ble.stopScan();
 };

 // Called when Start Scan button is selected.
 app.ui.onStartScanButton = function()
 {
 	app.startScan(app.ui.deviceFound);
 	app.ui.displayStatus('Scanning...');
-	app.ui.updateTimer = setInterval(app.ui.displayDeviceList, 500);
 };

 // Called when Stop Scan button is selected.
 app.ui.onStopScanButton = function()
 {
 	app.stopScan();
 	app.devices = {};
 	app.ui.displayStatus('Scan Paused');
 	app.ui.displayDeviceList();
-	clearInterval(app.ui.updateTimer);
 };

 // Called when a device is found.
 app.ui.deviceFound = function(device, errorCode)
 {
 	if (device)
 	{
-		// Set timestamp for device (this is used to remove
-		// inactive devices).
+		// Set timestamp for device, this is used to remove inactive devices.
 		device.timeStamp = Date.now();

-		// Insert the device into table of found devices.
-		app.devices[device.address] = device;
+		// Report device to Phoenix backend.
+		app.phoenixSend(JSON.stringify(device));
 	}
 	else if (errorCode)
 	{
 		app.ui.displayStatus('Scan Error: ' + errorCode);
 	}
 };

 // Display the device list.
 app.ui.displayDeviceList = function()
 {
 	// Clear device list.
 	$('#found-devices').empty();

 	var timeNow = Date.now();

 	$.each(app.devices, function(key, device)
 	{
 		// Only show devices that are updated during the last 10 seconds.
 		if (device.timeStamp + 10000 > timeNow)
 		{
 			// Map the RSSI value to a width in percent for the indicator.
 			var rssiWidth = 100; // Used when RSSI is zero or greater.
 			if (device.rssi < -100) { rssiWidth = 0; }
 			else if (device.rssi < 0) { rssiWidth = 100 + device.rssi; }

 			// Create tag for device data.
 			var element = $(
 				'<li>'
 				+	'<strong>' + device.name + '</strong><br />'
 				// Do not show address on iOS since it can be confused
 				// with an iBeacon UUID.
 				+	(evothings.os.isIOS() ? '' : device.address + '<br />')
 				+	device.rssi + '<br />'
 				+ 	'<div style="background:rgb(225,0,0);height:20px;width:'
 				+ 		rssiWidth + '%;"></div>'
 				+ '</li>'
 			);

 			$('#found-devices').append(element);
 		}
 	});
 };

 // Display a status message
 app.ui.displayStatus = function(message)
 {
 	$('#scan-status').html(message);
 };

 app.initialize();
- In lines 31-55 we create our Phoenix socket and join a channel on it
- In line 57-60 we register a handler for the topic “scan:device”
- In line 63 we start a timer to update our display list every 0.5 sec
- In line 93-98 we parse the incoming JSON and add a device in the list
- In line 100-107 we push the device JSON onto the same topic
- We remove line 120 and 130 since we use the timer all the time now regardless if scanning
- In line 143-146 we send the JSON to Phoenix instead of just adding it to the display list
IMPORTANT: On line 34 you will need to stuff in your own ipname for your Phoenix server, and port. Or else you will connect to mine, which is of course just fine too :)

No magic going on here really, we simply push any discovered device as JSON back to Phoenix on the topic. And we also show any incoming devices on the same topic on the display list.
Secure Websockets Link to heading
When running the Evothings Viewer like we do, via Evothings Studio, the app is actually served via HTTPS to the viewer from Evothing’s proxy servers running in the cloud. So if the app is meant to connect to some other server (like our Phoenix server) using websockets, it needs to also use proper HTTPS, otherwise it will not work.
So we need to get our Phoenix to talk HTTPS with a proper cert, self signed doesn’t cut it for secure websockets.
I first tried CACert.org, but that … failed in various ways. Then someone hinted that StartSSL actually gives you ONE fully proper cert for free! And sure enough that worked great. So get a free one from them matching the ipname of your server - it was fairly easy to do.
You will however need to remove the pass phrase, but I solved that easily with:
openssl rsa -in ssl.key.bak -out ssl.key.nopass
Then we can configure Phoenix
to use this cert by modifying config/dev.exs:
 # watchers to your application. For example, we use it
 # with brunch.io to recompile .js and .css sources.
 config :multiscan, Multiscan.Endpoint,
-  http: [port: 4000],
+  url: [host: "padme.krampe.se", port: 1443],
+  https: [port: 1443,
+          otp_app: :multiscan,
+          keyfile: System.get_env("MULTISCAN_SSL_KEY_PATH"),
+          certfile: System.get_env("MULTISCAN_SSL_CERT_PATH"),
+          cacertfile: System.get_env("MULTISCAN_CERTFILE_PATH")],
   debug_errors: true,
   code_reloader: true,
   cache_static_lookup: false,
   check_origin: false,
   watchers: [node: ["node_modules/brunch/bin/brunch", "watch", "--stdin"]]
Of course you should use your own host and port on line 5 above. And then I added a run.sh that looks like this:
export MULTISCAN_SSL_KEY_PATH=$PWD/cert/ssl.key.nopass
export MULTISCAN_SSL_CERT_PATH=$PWD/cert/ssl.crt
export MULTISCAN_CERTFILE_PATH=$PWD/cert/sub.class1.server.ca.pem

mix phoenix.server
… so in the local directory cert you need to place those three files from StartSSL. Then just run it and with some luck it will start serve on HTTPS :)

Trying it out! Link to heading
Now, for those approximate 3 people out there that bothered reading this far … :) Time to see if it works!
You can try this out in different ways:
- Run your own app but still pointing at
padme.krampe.se:1443 - Run your own app pointing at your own server
Start up at least two devices with the app, then if things work you should be able to start scanning on any of them and they should both quickly show the devices found. Note however that if others are using my server you will see their devices too. The following movie shows it working:

What next? Link to heading
Please give feedback in the comments below and I can adjust this article accordingly! You can also find me and the rest of the Evothings team at gitter or on #evothings at freenode.
An obious extension to this experiment here would be to add a web frontend to this in Phoenix so that you can just surf there to see all scanned devices in realtime, and of course throw some Ecto love at it to make some stuff persistent.
Hope you found this interesting!
regards, Göran